बैक-एंड से उत्पाद संपादित करते समय कस्टम डेटाबेस तालिका में कस्टम फ़ील्ड को कैसे बचाया जाए?


11

मैंने बैक-एंड में उत्पाद रूप पर कस्टम टैब प्रदर्शित करने के लिए एक कस्टम मॉड्यूल बनाया है। मैंने इस समाधान का उपयोग किया ।

अब टैब पर मैं कस्टम डेटाबेस तालिका में सहेजने के लिए कस्टम फ़ील्ड जोड़ रहा हूं। कहते हैं<input type="text" name="my_new_field" value="123">

साथ ही नीचे दिए गए एडमिन प्रोडक्ट सेव के लिए एक कस्टम कंट्रोलर बनाया।

आदि / di.xml में

<?xml version="1.0"?>
<config xmlns:xsi="http://www.w3.org/2001/XMLSchema-instance" xsi:noNamespaceSchemaLocation="urn:magento:framework:ObjectManager/etc/config.xsd">
    <preference for="Magento\Catalog\Controller\Adminhtml\Product\Save" type="Namespace\Module\Controller\Adminhtml\Rewrite\Product\Save" />
</config>

और कंट्रोलर / एडमिनिस्ट्रेटर / रिवाइट / प्रोडक्ट / सेव.फैप में

<?php

    namespace Namespace\Module\Controller\Adminhtml\Rewrite\Product;

    class Save extends \Magento\Catalog\Controller\Adminhtml\Product\save
    {

        public function execute()
        {
            echo "hello"; print_r($_POST); die;

            return parent::execute();
        }
    }

अब executeफ़ंक्शन में मैं POST मान की उम्मीद कर रहा हूं my_new_field। लेकिन मुझे नहीं मिल रहा है। प्राप्त करने के बाद मैं कस्टम तालिका में डेटा को बचाने के लिए कस्टम क्वेरी का उपयोग करूंगा।

मैं क्या गलत कर रहा हूं या मुझे किसी और तरीके का इस्तेमाल करना चाहिए?

अपडेट: 26 अगस्त।

मैंने उत्पाद टैब से डेटा को बचाने के लिए अजाक्स फॉर्म का उपयोग किया है क्योंकि मेरे पास समय प्रतिबंध था। मैंने @ william-oakley का उत्तर स्वीकार कर लिया है। अब जैसा कि @mageworx ने अपने जवाब में जोड़ा कि यह ऐसा करने का एक मानक तरीका नहीं है।

मैं आगे के विकास में यूआई फॉर्म मानक उपयोग का उपयोग करना चाहता हूं। तो मेरा सवाल है कि UI फॉर्म मानक का उपयोग करके उत्पाद संपादित करने के लिए कस्टम टैब कैसे जोड़ें और कस्टम फ़ील्ड को कस्टम तालिका या किसी अन्य तरीके से सहेजें।


1
अरे, आप इस कस्टम सेव फील के लिए ऑब्जर्वर में कैटलॉगप्रोड्सवेसबियर। एफपी फाइल का उपयोग कर सकते हैं।
पायल पटेल

जवाबों:


14

आप केवल "नग्न" इनपुट फ़ील्ड का उपयोग कर सकते हैं, आपको बस निम्नलिखित विशेषता को जोड़ना होगा:

data-form-part="product_form"

इसलिए:

<input data-form-part="product_form" type="text" name="my_new_field" value="123">

फिर आप अपने इनपुट के लिए POST डेटा प्राप्त कर सकेंगे।


7

उपरोक्त समाधान पूरी तरह से सही नहीं है। आप एक फ़ील्ड को "नग्न" html तत्व के रूप में जोड़ रहे हैं और एक उत्पाद रूप अपने स्वयं के विशिष्टताओं के साथ एक यूआई रूप है। vendor/magento/module-ui/view/base/web/js/form/form.jsप्रपत्र भेजने पर फ़ील्ड संग्रह और उनकी मान्यता के लिए एक विशेष वर्ग ( ) जिम्मेदार होता है। साथ ही, इस वर्ग को उन फ़ील्ड्स को याद करना चाहिए जो इस UI फ़ॉर्म से संबंधित नहीं हैं या additional fieldsआपके सभी फ़ील्ड की तरह नहीं हैं। आपको निम्नलिखित नामकरण का उपयोग यह सुनिश्चित करने के लिए करना चाहिए कि आपका क्षेत्र नियंत्रक को भेजा जाएगा:

input type="text" name="product[my_new_field]" value="123"

लेकिन यह पूरी तरह से सही नहीं है क्योंकि सही समाधान यूआई फॉर्म उपयोग मानकों से विचलित नहीं है और इसके मूल तत्वों और घटकों का उपयोग करना है। इस मामले में आपको इस तरह की चिंता नहीं करनी चाहिए क्योंकि सब कुछ स्वचालित रूप से संसाधित हो जाएगा।

प्रक्रिया को समझने के लिए आप UI फ़ॉर्म डेटा संग्रहीत करने की मुख्य विधि की जाँच कर सकते हैं:

/**
 * Submits form
 *
 * @param {String} redirect
 */
submit: function (redirect) {
    var additional = collectData(this.additionalFields),
        source = this.source;

    _.each(additional, function (value, name) {
        source.set('data.' + name, value);
    });

    source.save({
        redirect: redirect,
        ajaxSave: this.ajaxSave,
        ajaxSaveType: this.ajaxSaveType,
        response: {
            data: this.responseData,
            status: this.responseStatus
        },
        attributes: {
            id: this.namespace
        }
    });
},

जैसा कि आप इस कोड से देख सकते हैं, एक html फॉर्म जिसके सभी फ़ील्ड नहीं भेजे गए हैं। हालाँकि, this.sourceऔर this.additionalFieldsभेजे जाते हैं लेकिन इसमें आपका तत्व शामिल नहीं है क्योंकि इसे गलत घोषित किया गया है।

08.23.2016 से अद्यतन

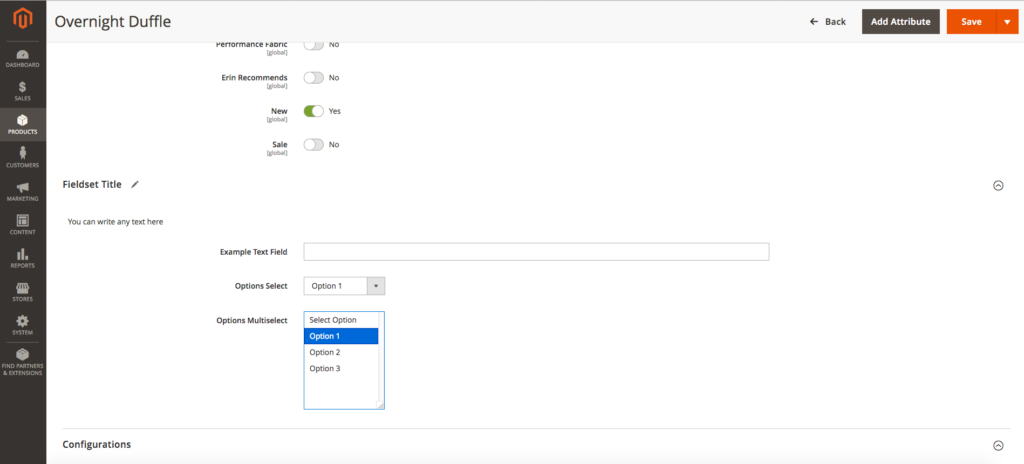
यहाँ एक उदाहरण है कि हमारे ब्लॉग से फ़ील्डसेट कैसे जोड़ा जाए। आप नीचे दिए गए लिंक का उपयोग करके पूरा लेख पढ़ सकते हैं:

स्रोत: UI के लिए फ़ील्ड के साथ फ़ील्डसेट जोड़ने का एक आसान तरीका :

सामग्री जोड़ें: इसके अलावा यूआई-फॉर्म मेटा-डेटा और वर्चुअल प्रकार।

एक फ़ाइल बनाएँ app/code/Vendor/Product/etc/adminhtml/di.xml। हम अंदर एक संशोधक लगाने जा रहे हैं:

<?xml version="1.0"?>
<config xmlns:xsi="http://www.w3.org/2001/XMLSchema-instance" xsi:noNamespaceSchemaLocation="urn:magento:framework:ObjectManager/etc/config.xsd">
    <virtualType name="Magento\Catalog\Ui\DataProvider\Product\Form\Modifier\Pool">
        <arguments>
            <argument name="modifiers" xsi:type="array">
                <item name="custom-fieldset" xsi:type="array">
                    <item name="class" xsi:type="string">Vendor\Product\Ui\DataProvider\Product\Form\Modifier\CustomFieldset</item>
                    <item name="sortOrder" xsi:type="number">10</item>
                </item>
            </argument>
        </arguments>
    </virtualType>
</config>

अब, app/code/Vendor/Product/Ui/DataProvider/Product/Form/Modifier/CustomFieldset.phpउत्पाद संपादन पृष्ठ के लिए कस्टम फ़ील्डसेट के साथ संशोधक फ़ाइल ( ) बनाएं और इसे फ़ील्ड से भरें:

<?php
namespace Vendor\Product\Ui\DataProvider\Product\Form\Modifier;

use Magento\Catalog\Model\Locator\LocatorInterface;
use Magento\Catalog\Ui\DataProvider\Product\Form\Modifier\AbstractModifier;
use Magento\Framework\Stdlib\ArrayManager;
use Magento\Framework\UrlInterface;
use Magento\Ui\Component\Container;
use Magento\Ui\Component\Form\Fieldset;
use Magento\Ui\Component\Form\Element\DataType\Number;
use Magento\Ui\Component\Form\Element\DataType\Text;
use Magento\Ui\Component\Form\Element\Input;
use Magento\Ui\Component\Form\Element\Select;
use Magento\Ui\Component\Form\Element\MultiSelect;
use Magento\Ui\Component\Form\Field;

class CustomFieldset extends AbstractModifier
{

    // Components indexes
    const CUSTOM_FIELDSET_INDEX = 'custom_fieldset';
    const CUSTOM_FIELDSET_CONTENT = 'custom_fieldset_content';
    const CONTAINER_HEADER_NAME = 'custom_fieldset_content_header';

    // Fields names
    const FIELD_NAME_TEXT = 'example_text_field';
    const FIELD_NAME_SELECT = 'example_select_field';
    const FIELD_NAME_MULTISELECT = 'example_multiselect_field';

    /**
     * @var \Magento\Catalog\Model\Locator\LocatorInterface
     */
    protected $locator;

    /**
     * @var ArrayManager
     */
    protected $arrayManager;

    /**
     * @var UrlInterface
     */
    protected $urlBuilder;

    /**
     * @var array
     */
    protected $meta = [];

    /**
     * @param LocatorInterface $locator
     * @param ArrayManager $arrayManager
     * @param UrlInterface $urlBuilder
     */
    public function __construct(
        LocatorInterface $locator,
        ArrayManager $arrayManager,
        UrlInterface $urlBuilder
    ) {
        $this->locator = $locator;
        $this->arrayManager = $arrayManager;
        $this->urlBuilder = $urlBuilder;
    }

    /**
     * Data modifier, does nothing in our example.
     *
     * @param array $data
     * @return array
     */
    public function modifyData(array $data)
    {
        return $data;
    }

    /**
     * Meta-data modifier: adds ours fieldset
     *
     * @param array $meta
     * @return array
     */
    public function modifyMeta(array $meta)
    {
        $this->meta = $meta;
        $this->addCustomFieldset();

        return $this->meta;
    }

    /**
     * Merge existing meta-data with our meta-data (do not overwrite it!)
     *
     * @return void
     */
    protected function addCustomFieldset()
    {
        $this->meta = array_merge_recursive(
            $this->meta,
            [
                static::CUSTOM_FIELDSET_INDEX => $this->getFieldsetConfig(),
            ]
        );
    }

    /**
     * Declare ours fieldset config
     *
     * @return array
     */
    protected function getFieldsetConfig()
    {
        return [
            'arguments' => [
                'data' => [
                    'config' => [
                        'label' => __('Fieldset Title'),
                        'componentType' => Fieldset::NAME,
                        'dataScope' => static::DATA_SCOPE_PRODUCT, // save data in the product data
                        'provider' => static::DATA_SCOPE_PRODUCT . '_data_source',
                        'ns' => static::FORM_NAME,
                        'collapsible' => true,
                        'sortOrder' => 10,
                        'opened' => true,
                    ],
                ],
            ],
            'children' => [
                static::CONTAINER_HEADER_NAME => $this->getHeaderContainerConfig(10),
                static::FIELD_NAME_TEXT => $this->getTextFieldConfig(20),
                static::FIELD_NAME_SELECT => $this->getSelectFieldConfig(30),
                static::FIELD_NAME_MULTISELECT => $this->getMultiSelectFieldConfig(40),
            ],
        ];
    }

    /**
     * Get config for header container
     *
     * @param int $sortOrder
     * @return array
     */
    protected function getHeaderContainerConfig($sortOrder)
    {
        return [
            'arguments' => [
                'data' => [
                    'config' => [
                        'label' => null,
                        'formElement' => Container::NAME,
                        'componentType' => Container::NAME,
                        'template' => 'ui/form/components/complex',
                        'sortOrder' => $sortOrder,
                        'content' => __('You can write any text here'),
                    ],
                ],
            ],
            'children' => [],
        ];
    }

    /**
     * Example text field config
     *
     * @param $sortOrder
     * @return array
     */
    protected function getTextFieldConfig($sortOrder)
    {
        return [
            'arguments' => [
                'data' => [
                    'config' => [
                        'label' => __('Example Text Field'),
                        'formElement' => Field::NAME,
                        'componentType' => Input::NAME,
                        'dataScope' => static::FIELD_NAME_TEXT,
                        'dataType' => Number::NAME,
                        'sortOrder' => $sortOrder,
                    ],
                ],
            ],
        ];
    }

    /**
     * Example select field config
     *
     * @param $sortOrder
     * @return array
     */
    protected function getSelectFieldConfig($sortOrder)
    {
        return [
            'arguments' => [
                'data' => [
                    'config' => [
                        'label' => __('Options Select'),
                        'componentType' => Field::NAME,
                        'formElement' => Select::NAME,
                        'dataScope' => static::FIELD_NAME_SELECT,
                        'dataType' => Text::NAME,
                        'sortOrder' => $sortOrder,
                        'options' => $this->_getOptions(),
                        'visible' => true,
                        'disabled' => false,
                    ],
                ],
            ],
        ];
    }

    /**
     * Example multi-select field config
     *
     * @param $sortOrder
     * @return array
     */
    protected function getMultiSelectFieldConfig($sortOrder)
    {
        return [
            'arguments' => [
                'data' => [
                    'config' => [
                        'label' => __('Options Multiselect'),
                        'componentType' => Field::NAME,
                        'formElement' => MultiSelect::NAME,
                        'dataScope' => static::FIELD_NAME_MULTISELECT,
                        'dataType' => Text::NAME,
                        'sortOrder' => $sortOrder,
                        'options' => $this->_getOptions(),
                        'visible' => true,
                        'disabled' => false,
                    ],
                ],
            ],
        ];
    }

    /**
     * Get example options as an option array:
     *      [
     *          label => string,
     *          value => option_id
     *      ]
     *
     * @return array
     */
    protected function _getOptions()
    {
        $options = [
            1 => [
                'label' => __('Option 1'),
                'value' => 1
            ],
            2 => [
                'label' => __('Option 2'),
                'value' => 2
            ],
            3 => [
                'label' => __('Option 3'),
                'value' => 3
            ],
        ];

        return $options;
    }
}

पूर्वावलोकन

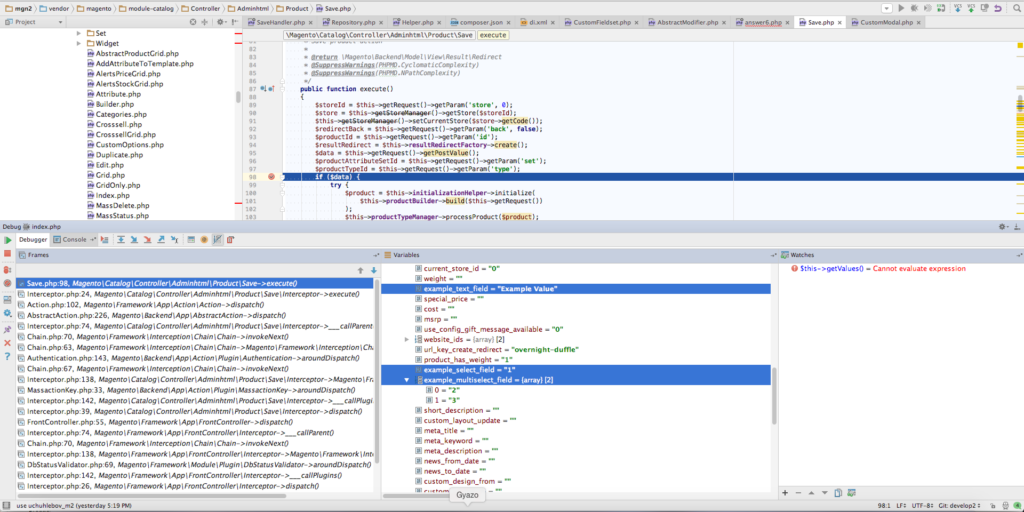
डेटा की बचत vendor/magento/module-catalog/Controller/Adminhtml/Product/Save.php मुख्य निष्पादन विधि में उत्पाद नियंत्रक फ़ाइल के अंदर होती है। यदि सब कुछ सही तरीके से किया गया है, तो इस पद्धति के इनपुट डेटा में हमारा डेटा सही ढंग से प्रदर्शित होगा:

पूर्वावलोकन

ध्यान दें, यदि आपके उत्पाद में शुरुआत से ही वे गुण नहीं हैं, तो आपको उन्हें मैन्युअल रूप से सहेजना चाहिए। आप इसे प्रेक्षक में कर सकते हैं।

सबसे पहले, इसे app/code/Vendor/Product/etc/adminhtml/events.xmlफ़ाइल में घोषित करें (हम adminhtml गुंजाइश का उपयोग कर रहे हैं क्योंकि सामने के छोर पर फॉर्म मौजूद नहीं है):

<?xml version="1.0"?>
<config xmlns:xsi="http://www.w3.org/2001/XMLSchema-instance" xsi:noNamespaceSchemaLocation="urn:magento:framework:Event/etc/events.xsd">
    <event name="catalog_product_save_after">
        <observer name="save_example_data" instance="Vendor\Product\Observer\ProductSaveAfter" />
    </event>
</config>

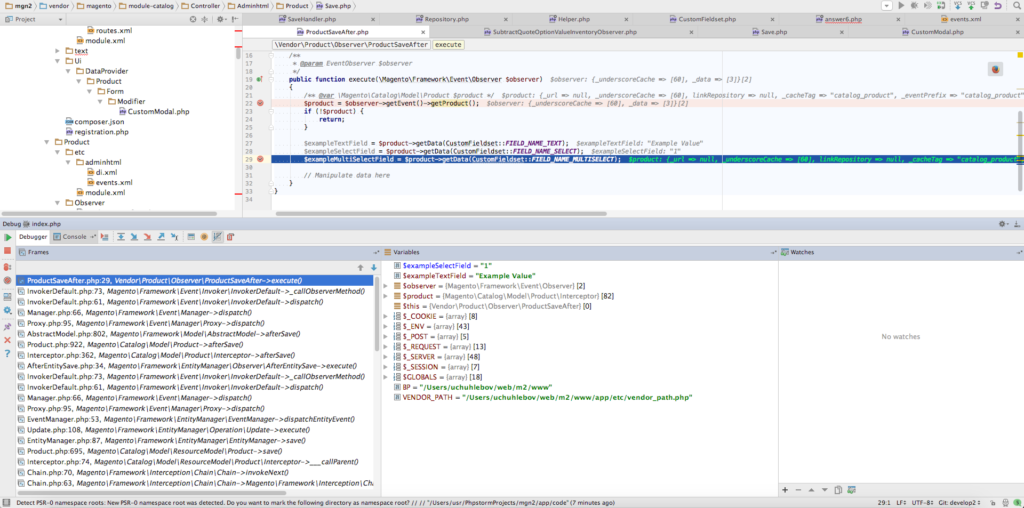
फिर, प्रेक्षक के वर्ग को बनाएँ जिसे हमने उदाहरण विशेषता में बताया है app/code/Vendor/Product/Observer/ProductSaveAfter.php: -

<?php
namespace Vendor\Product\Observer;

use \Magento\Framework\Event\ObserverInterface;
use \Magento\Framework\Event\Observer as EventObserver;
use Vendor\Product\Ui\DataProvider\Product\Form\Modifier\CustomFieldset;

class ProductSaveAfter implements ObserverInterface
{

    /**
     * @param EventObserver $observer
     */
    public function execute(\Magento\Framework\Event\Observer $observer)
    {
        /** @var \Magento\Catalog\Model\Product $product */
        $product = $observer->getEvent()->getProduct();
        if (!$product) {
            return;
        }

        $exampleTextField = $product->getData(CustomFieldset::FIELD_NAME_TEXT);
        $exampleSelectField = $product->getData(CustomFieldset::FIELD_NAME_SELECT);
        $exampleMultiSelectField = $product->getData(CustomFieldset::FIELD_NAME_MULTISELECT);

        // Manipulate data here
    }
}

प्रेक्षक में डेटा:

पूर्वावलोकन

अब, आप अपने स्वयं के मॉडल को पर्यवेक्षक से कॉल कर सकते हैं और उसमें डेटा सहेज सकते हैं या अपनी इच्छानुसार संशोधित कर सकते हैं।

सावधान रहे! यदि आपके मॉडल की बचत उत्पाद की बचत से जुड़ी है, तो यह पुनरावृत्ति की ओर ले जा सकता है।


क्या आप सुझाव दे सकते हैं कि मैं UI फ़ॉर्म फ़ील्ड कैसे जोड़ सकता हूँ?
HungryDB

1
@HungryDB हमने ऊपर दिए गए उत्तर को अपडेट किया है और हमारे ब्लॉग से लेख का लिंक जोड़ा है। आप पढ़ सकते हैं कि वहां एक फ़ील्डसेट कैसे बनाया जाए।
मेगवर्क्स

3
उत्तर @mageworx के लिए धन्यवाद। मैंने डेटा को बचाने के लिए अजाक्स फॉर्म विधि का उपयोग करने का फैसला किया, हालांकि मेरे पास समय की पाबंदी है। समय मिलने पर मैं आपके तरीके को जरूर आजमाऊंगा।
HungryDB

तो मैं इन डेटा को डेटाबेस में कैसे सहेजूँ?
ची

जवाब के लिए धन्यवाद। यह तरीका काम कर रहा है। मैंने एक कस्टम चयन फ़ील्ड जोड़ा है और मान को ऑब्जर्वर का उपयोग करके मेरी तालिका में सहेजा गया है। लेकिन उसी उत्पाद को संपादित करने पर, मेरे मान चयनित के रूप में प्रदर्शित नहीं होते हैं। कृपया मदद कीजिए ।
विंधुजा

2

उत्पाद तालिका को कस्टम तालिका में सहेजने के लिए, आप स्तरीय मूल्य के तर्क का अनुसरण कर सकते हैं। मैगेंटो टियर प्राइस के बैकएंड कस्टम मॉडल की मदद से टियर प्राइस को बचाएगा। हम अपने कस्टम फील्ड / एटिब्यूट के लिए उसी तर्क का अनुसरण कर सकते हैं। कस्टम तालिका में अटारी को बचाने के लिए आपको कस्टम विशेषता बनाना होगा और इसे बैकएंड मॉडल प्रदान करना होगा। बैकेंड मॉडल अटैचमेंट को सहेज और सहेज कर रखेगा। आप नीचे दिए गए चरणों का पालन कर सकते हैं।

चरण 1. उत्पाद विशेषता बनाएँ

<?php 
namespace Magentoins\TestAttribute\Setup; 
use Magento\Eav\Setup\EavSetup;
use Magento\Eav\Setup\EavSetupFactory;
use Magento\Framework\Setup\InstallDataInterface;
use Magento\Framework\Setup\ModuleContextInterface;
use Magento\Framework\Setup\ModuleDataSetupInterface;


class InstallData implements InstallDataInterface

{    
    private $eavSetupFactory; 
    public function __construct(EavSetupFactory $eavSetupFactory)
    {
        $this->eavSetupFactory = $eavSetupFactory;
    }

    /**
     * {@inheritdoc}
     * @SuppressWarnings(PHPMD.ExcessiveMethodLength)
     */
    public function install(ModuleDataSetupInterface $setup, ModuleContextInterface $context)
    {
        /** @var EavSetup $eavSetup */
        $eavSetup = $this->eavSetupFactory->create(['setup' => $setup]);

        /**
         * Add attributes to the eav/attribute
         */

        $eavSetup->addAttribute(
            \Magento\Catalog\Model\Product::ENTITY,
            'test_attribute',
            [
                'type' => 'int',
                'backend' => 'Magentoins\TestAttribute\Model\Product\Attribute\Backend\TestAttribute',
                'frontend' => '',
                'label' => 'Test Attribute',
                'input' => '',
                'class' => '',
                'source' => '',
                'global' => \Magento\Catalog\Model\Resource\Eav\Attribute::SCOPE_GLOBAL,
                'visible' => true,
                'required' => false,
                'user_defined' => false,
                'default' => 0,
                'searchable' => false,
                'filterable' => false,
                'comparable' => false,
                'visible_on_front' => false,
                'used_in_product_listing' => true,
                'unique' => false,
                'apply_to' => ''
            ]
        );
    }
}

चरण 2. उत्पाद कस्टम विशेषता के लिए बैकएंड मॉडल बनाएं जो सत्यापन के लिए मदद करेगा और विशेषता मूल्य को बचाने और पुनर्प्राप्त करेगा

<?php
namespace Magentoins\TestAttribute\Model\Product\Attribute\Backend;

class TestAttribute extends \Magento\Catalog\Model\Product\Attribute\Backend\Tierprice
{
  protected $_productAttributeBackendTestAttribute;
  /**
   * Website currency codes and rates
   *
   * @var array
   */
  protected $_rates;

  protected $_helper;

  protected $eavConfig;

  public function __construct(
      \Magento\Directory\Model\CurrencyFactory $currencyFactory,
      \Magento\Store\Model\StoreManagerInterface $storeManager,
      \Magento\Catalog\Helper\Data $catalogData,
      \Magento\Framework\App\Config\ScopeConfigInterface $config,
      \Magento\Framework\Locale\FormatInterface $localeFormat,
      \Magento\Catalog\Model\Product\Type $catalogProductType,
      \Magento\Customer\Api\GroupManagementInterface $groupManagement,
      \Magento\Catalog\Model\ResourceModel\Product\Attribute\Backend\Tierprice $productAttributeTierprice,
      \Magentoins\TestAttribute\Model\ResourceModel\Product\Attribute\Backend\TestAttribute $productAttributeBackendFixedprices,
      \Magentoins\TestAttribute\Helper\Data $helperData,
      \Magento\Eav\Model\Config $eavConfig
  ) {
    parent::__construct(
        $currencyFactory,
        $storeManager,
        $catalogData,
        $config,
        $localeFormat,
        $catalogProductType,
        $groupManagement,
        $productAttributeTierprice
    );
    $this->_productAttributeBackendTestAttribute = $productAttributeBackendTestAttribute;    

  }

  /**
   * Retrieve resource instance
   *
   */
  protected function _getResource()
  {
    return $this->_productAttributeBackendTestAttribute;
  }

  public function getAttribute()
  {
    $attribute = $this->eavConfig->getAttribute('catalog_product', 'test_attribute');
    return $attribute;
  }
  /**
   * Validate test_attribute data
   *
   */
  public function validate ($object)
  {
    $attribute = $this->getAttribute();
    $attr = $object->getData($attribute->getName());
    if (empty($attr)) {
      return true;
    }    

    return true;
  }

  /**
   * Assign test_attribute to product data   
   */
  public function afterLoad ($object)
  {
    /*$data is from your custom table*/
    $data = $this->_getResource()->loadTestAttributeData($object->getId(), $websiteId);
    $object->setData($this->getAttribute()->getName(), $data);
    $object->setOrigData($this->getAttribute()->getName(), $data);

    $valueChangedKey = $this->getAttribute()->getName() . '_changed';
    $object->setOrigData($valueChangedKey, 0);
    $object->setData($valueChangedKey, 0);

    return $this;
  }

  /**
   * After Save Attribute manipulation 
   */
  public function afterSave ($object)
  {
    $websiteId = $this->_storeManager->getStore($object->getStoreId())->getWebsiteId();
    $isGlobal = $this->getAttribute()->isScopeGlobal() || $websiteId == 0;

    $testAttribute = $object->getData($this->getAttribute()->getName());

    /*Save attribute value in custom table with the help of resource model*/

    $this->_getResource()->saveTestAttributeData($testAttribute);

    return $this;
  }

  public function beforeSave ($object)
  {
    parent::beforeSave($object);        
  }

}

चरण 2। कस्टम टेबल से विशेषता मान को सहेजने और पुनः प्राप्त करने के लिए संसाधन मॉडल

<?php
namespace Magentoins\TestAttribute\Model\ResourceModel\Product\Attribute\Backend;

use Magento\Catalog\Model\ResourceModel\Product\Attribute\Backend\Tierprice;

/**
 * @author
 */
class TestAttribute extends Tierprice
{
    /**
     * Initialize connection and define main table
     *
     * @return void
     */
    protected function _construct()
    {
        $this->_init('magentoins_product_entity_testAttribute', 'value_id');
    }

    /**
     * Load Fixed Prices for product
     *
     * @param int $productId
     * @return Designnbuy_Fixedprices_Model_Mysql4_fixedprices
     */
    public function loadTestAttributeData($productId, $websiteId = null)
    {
        $connection = $this->getConnection();
        $columns = array (
            'test_attribute' => $this->getIdFieldName()            
        );
        $select = $connection->select()
            ->from($this->getMainTable(), $columns)
            ->where('entity_id=?', $productId)
            ->order('order');

        if (!is_null($websiteId)) {
            if ($websiteId == '0') {
                $select->where('website_id=?', $websiteId);
            } else {
                $select->where('website_id IN(?)', array ('0', $websiteId
                ));
            }
        }

        return $connection->fetchAll($select);
    }

    public function saveTestAttributeData(\Magento\Framework\DataObject $attributeObject)
    {
        $connection = $this->getConnection();
        $data = $this->_prepareDataForTable($attributeObject, $this->getMainTable());

        if (!empty($data[$this->getIdFieldName()])) {
            $where = $connection->quoteInto($this->getIdFieldName() . ' = ?', $data[$this->getIdFieldName()]);
            unset($data[$this->getIdFieldName()]);
            $connection->update($this->getMainTable(), $data, $where);
        } else {
            $connection->insert($this->getMainTable(), $data);
        }
        return $this;
    }
}
हमारी साइट का प्रयोग करके, आप स्वीकार करते हैं कि आपने हमारी Cookie Policy और निजता नीति को पढ़ और समझा लिया है।
Licensed under cc by-sa 3.0 with attribution required.